rails-practice
3.3 视图中的 AJAX 交互
概要:
本课时通过对商品的添加、编辑和删除,讲解视图中如何使用 UJS,jQuery 和 JSON,实现无刷新情况下的页面更新。
知识点:
- jQuery
- UJS
- AJAX
- JSON
正文
上一节,我们讲解了 Rails 中的视图(View),我们再回顾一下这个视图是如何产生的:我们向服务器发起一个请求,服务器返给我们结果,查看源代码,它是一篇 HTML 的代码。
我们每次请求一个地址,都会给我们完整的 HTML 结果,对于内容较少的网页,传输起来还是很快的,但是对于内容多的网页,大篇的结果自然会拖慢页面显示。
当我们浏览页面的时候,并不期望总是刷新整个页面,因为它没必要。现在我们有 ajax 技术,可以只加载和显示部分页面代码。举个简单的例子:当我们提交了一条评论,页面上自动显示出我们提交的评论内容。我们点击购买按钮,页面上就提示我们购物车里增加了一个商品。而这些,都不必要刷新整个页面。
ajax 是 Asynchronous Javascript And XML 的缩写,含义是异步的 js 和 XML 交互技术。XML,可扩展标记语言,我们使用的 HTML 是基于其发展起来的。
下面我们看下 Rails 是如何把 ajax 技术应用在视图(View)中的。
3.3.1 ujs
我们在 Gemfile 中已经使用了 gem 'jquery-rails' 这个 Gem,它可以让我们在 application.js 中增加这两行:
//= require jquery
//= require jquery_ujs
jQuery 是一个轻量级的 js 库,可以方便的处理HTML,事件(Event),动态效果,为页面提供 ajax 交互。jQuery 有很完善的文档及演示代码,以及大量的插件。
Rails 使用一种叫 ujs(Unobtrusive JavaScript)的技术,将 js 应用到 DOM 上。我们来看一个例子:
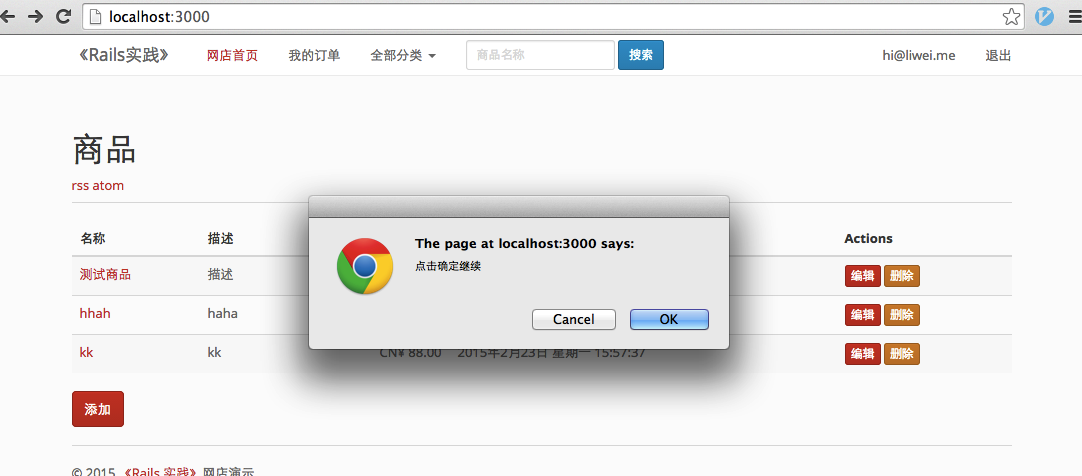
我们已经给删除连接增加了两个属性:
<%= link_to "删除", product, :method => :delete, :data => { :confirm => "点击确定继续" } %>
来看看我们的 HTML:
<a data-confirm="点击确定继续" rel="nofollow" data-method="delete" href="/products/1">删除</a>
辅助方法 link_to 使用了 :data => { :confirm => "点击确定继续" } 这个属性,为我们添加了 data-confirm="点击确定继续" 这样的 HTML 代码,之后 ujs 将它处理成一个弹出框。
在删除按钮上,还有 :method => :delete 属性,这为我们的连接上增加了 data-method="delete" 属性,这样,ujs 会把这个点击动作,会发送一个 delete 请求删除资源,这是符合 REST 要求的。
我们可以给 a 标签增加 data-disable-with 属性,当点击它的时候,使它禁用,并提示文字信息。这样可以防止用户多次提交表单,或者重复的链接操作。
我们为商品表单中的按钮,增加这个属性:
<%= f.submit nil, :data => { :"disable-with" => "请稍等..." } %>
当我们提交表单时,会有:
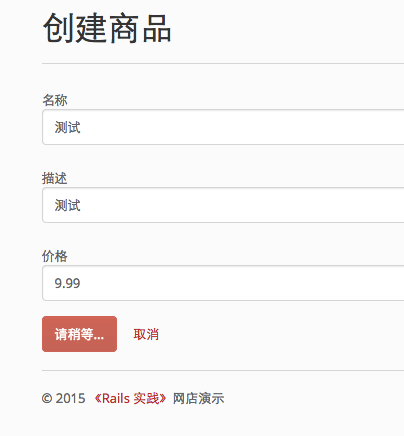
如果你还没看清楚效果,页面就已经跳转了,我们可以给 create 方法增加一个 sleep 10:
def create
  sleep 10
  @product = Product.new(product_params)
  ...
更多 ujs 支持的属性,我们在 这里 看到。
3.3.2 无刷新页面的操作
ujs 给我们带来的一些便利还不止这些,我们来点复杂的:在不刷新页面的情形下,添加一个商品,并显示在列表中。
我们现在的列表页是这样的:
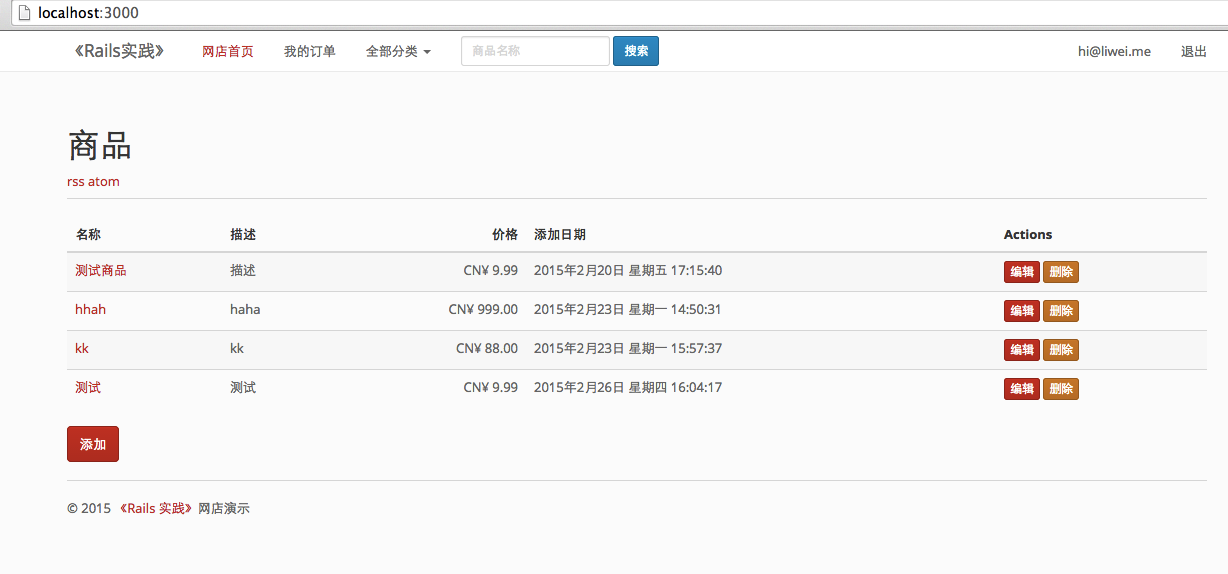
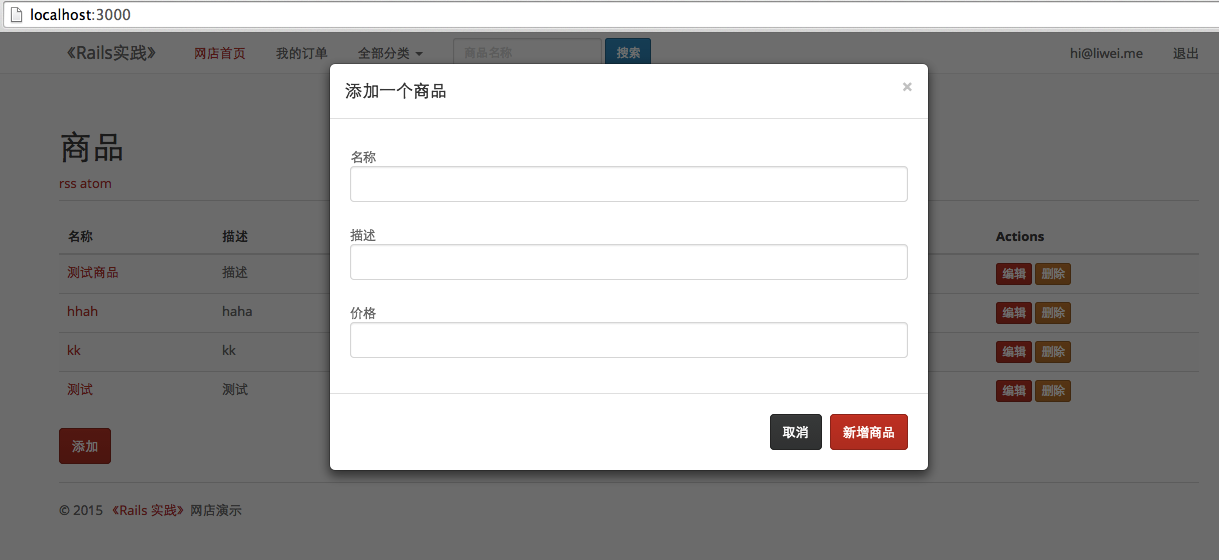
现在点击添加,我们会进入到 http://localhost:3000/products/new,我们并不改变它,毕竟在某些 js 失效的情形下,点击这个按钮还是要跳转到 new 页面的。
我们希望给页面增加一个表单,来输入新商品的信息,在这之前,我们想更酷一点,我们使用 modal 来显示这个表单:
<%= link_to t('.new', :default => t("helpers.links.new")), new_product_path, :class => 'btn btn-primary', data: {toggle: "modal", target: "#productForm"} %>
ujs 允许我们在 link 上增加额外的属性,当我们再次点击 添加 按钮时:
当然我做了其他一些修改,你可以在 这里 找到完整的代码。
为了产生一个 ajax 的请求,我们在表单上增加一个参数 remote: true:
<%= form_for @product, remote: true, :html => { :class => 'form-horizontal' } do |f| %>
这时,ujs 将会调用 jQuery.ajax() 提交表单,此时的请求是一个 text/javascript 请求,Rails 会返回给我们相应的结果,在我们的 action 里,增加这样的声明:
respond_to do |format|
  if @product.save
    format.html {...}
    format.js
  else
    format.html {...}
    format.js
  end
end
在保存(save)成功时,我们返回给视图(view)一个 js 片段,它可以在浏览器端执行。
我们创建一个新文件 app/views/products/create.js.erb,在这里,我们将新添加商品,显示在上面的列表中。
$('#productsTable').prepend('<%= j render(@product) %>');
$('#productFormModal').modal('hide');
我们使用 .js.erb 的文件,方便我们在 js 文件里插入 erb 的语法。
我们将一行商品信息使用 prepend 方法,插入到 productsTable 的最上面,j 方法将我们的字符串转换成 js 片段。
好了,你可以试一试效果了。
你可能也像我一样做了一些测试,导致插入了很多测试数据,为了继续不刷新页面就完成删除操作,我们给 删除 按钮上也增加一个 ajax 调用。
我们先给每一行记录,增加一个唯一的 ID 标识,通常使用“名字 + id”的形式,我们还需要给删除连接增加 remote: true 属性,我们编辑 app/views/products/_product.html.erb:
<tr id="product_<%= product.id %>">
...
<%= link_to "删除", product, :method => :delete, remote: true, :data => { :confirm => "点击确定继续" }, :class => 'btn btn-danger btn-xs' %>
我们再增加一个文件以返回 js 片段给浏览器执行 app/views/products/destroy.js.erb:
$('#product_<%= @product.id %>').fadeOut();
你可以再试试看。
现在,我们看一下添加商品时的返回结果:
$('#productsTable').prepend('<tr id=\"product_14\">\n  <td><a href=\"/products/14\">kkk<\/a><\/td>\n  <td>jjj<\/td>\n  <td class=\"text-right\">CN¥ 999.00<\/td>\n  <td>2015年2月26日 星期四 23:57:55<\/td>\n  <td>\n    <a class=\"btn btn-primary btn-xs\" href=\"/products/14/edit\">编辑<\/a>\n    <a data-confirm=\"点击确定继续\" class=\"btn btn-danger btn-xs\" data-remote=\"true\" rel=\"nofollow\" data-method=\"delete\" href=\"/products/14\">删除<\/a>\n  <\/td>\n<\/tr>\n');
$('#productFormModal').modal('hide');
这里面大部分代码是不必要的 HTML代码,如何让我们的返回结果更简洁呢?我们现在发送个是 text/javascript 请求,返回给我们的是 js 片段。下一节我们发送 ‘json’ 请求,我们在浏览器端使用 js 处理返回的 json 数据。
3.3.3 json 数据的页面处理
为了和添加商品区分开,我们在修改商品时,使用 json 来处理数据,而且也在一个 modal 中完成。
<%= link_to t('.edit', :default => t("helpers.links.edit")), edit_product_path(product), remote: true, data: { type: 'json' }, :class => 'btn btn-primary btn-xs editProductLink' %>
我们给编辑链接,增加了 remote: true, data: { type: 'json' },这时我们没有打开modal,我们把 js 代码写在 coffeescript 中。
我们新建一个文件,app/assets/javascripts/products.coffee。这个文件我们只在商品页面使用,所以不必把它放到 simplex.js 中,现在我们只在商品的 index.html.erb 中使用它,所以:
<%= content_for :page_javascript do %>
<%= javascript_include_tag "products" %>
...
当我们点击编辑按钮时,我们期望几件事:
- 打开
modal层,显示编辑表单 - 读取这个商品的信息(json 格式),把需要编辑的内容填入表单
好,我们写上这部分代码:
jQuery ->
  $(".editProductLink")
    .on "ajax:success", (e, data, status, xhr) ->
      $('#alert-content').hide() [1]
      $('#editProductFormModal').modal('show') [2]
      $('#editProductName').val(data['name']) [3]
      $('#editProductDescription').val(data['description']) [3]
      $('#editProductPrice').val(data['price']) [3]
      $("#editProductForm").attr('action', '/products/'+data['id']) [4]
- [1] 我们隐藏错误信息提示框
- [2] 显示层
- [3] 填入编辑的信息
- [4] 更改表单提交的地址
再来看看我们的编辑表单:
...
<%= form_tag "", method: :put, remote: true, data: { type: "json" }, id: "editProductForm", class: "form-horizontal" do %>
...
<%= text_field_tag "product[name]", "", :class => 'form-control', id: "editProductName", required: true %>
...
<%= text_field_tag "product[description]", "", :class => 'form-control', id: "editProductDescription" %>
...
<%= text_field_tag "product[price]", "", :class => 'form-control', id: "editProductPrice" %>
...
我们让表单提交的地址,可以根据选择的商品而改变,同时我们设定它的 type 为 json 格式。
我们为每一个输入框,设定了 ID,这样,我们用读取的 json 信息,分别填入对应的编辑框内。
然后,我们改动一下 controller 中的方法:
def edit
  respond_to do |format
    format.html
    format.json { render json: @product, status: :ok, location: @product } [1]
  end
end
- [1] 我们让 edit 方法,返回给我们商品的 json 格式信息。
def update
  respond_to do |format|
    if @product.update(product_params)
      format.html { redirect_to @product, notice: 'Product was successfully updated.' }
      format.json [1]
    else
      format.html { render :edit }
      format.json { render json: @product.errors.full_messages.join(', '), status: :error } [2]
    end
  end
end
- [1] 我们让 update 方法,可以接受 json 的请求,
- [2] 当 update 失败时,我们需要把失败的原因告诉客户端,它也是 json 格式的。
当我们需要考虑 update 方法会有成功和失败两种可能时,我们的 ajax 调用,就要这样来写了:
$("#editProductForm")
  .on "ajax:success", (e, data, status, xhr) ->
    $('#editProductFormModal').modal('hide') [1]
    $('#product_'+data['id']+'_name').html(  data['name'] ) [2]
    $('#product_'+data['id']+'_description').html(  data['description'] ) [2]
    $('#product_'+data['id']+'_price').html(  data['price'] ) [2]
  .on "ajax:error", (e, xhr, status, error) ->
    $('#alert-content').show() [3]
    $('#alert-content #msg').html( xhr.responseText ) [4]
- [1] 我们隐藏这个层
- [2] 当成功的时候,我们把修改好的信息,放回到我们的页面中
- [3] 当失败的时候,我们显示个错误信息提示框
- [4] 我们向这个框内,填入信息
更多 controller 的介绍,后面章节还会有,这里我们要了解的是,我们页面拿到的信息,不再是 js 片段,而是 json 格式的数据。
当我们处理大量数据的时候,json 明显要比 js 片段更节省传输空间,我们也可以把处理动作写到独立的 js 文件中,不过,json 格式返回给我们的,是 9.9,而我们页面显示的是格式化后的 CN¥ 9.90,如果我们想把处理好格式的数据返还回来,该如何处理呢?
我们可以使用 jbuilder 做这件事,我们新建一个 update.json.jbuilder:
json.id @product.id
json.name link_to @product.name, product_path(@product) [1]
json.description @product.description
json.price number_to_currency(@product.price) [2]
- [1] 我们把链接的地址用辅助方法生成
- [2] 我们用 number_to_currency 方法把价格格式化,这里可以使用辅助方法
如何知道我们的确使用的是 json 数据呢?我们可以查看浏览器的控制台,或者查看命令行的 log 输出。
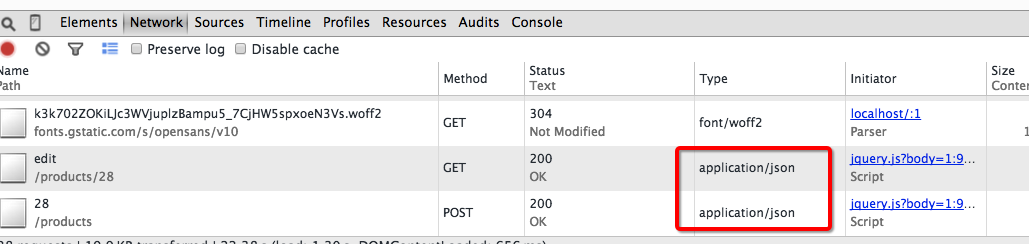
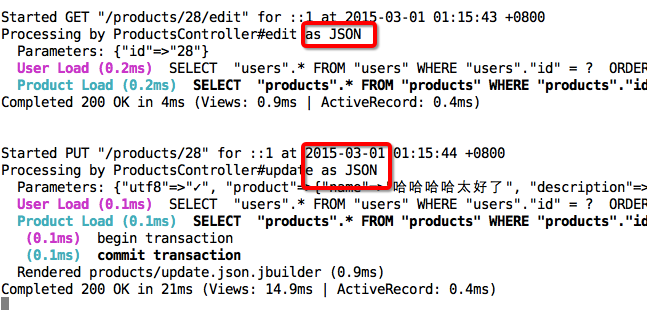
在 这里 可以找到我调试好的代码。
在实践开发中,我们会从服务端拿到很多的内容,比如几十条订单信息,我们可以用上面的方法把它们显示到页面上,也可以使用 http://handlebarsjs.com/ 这种模板引擎,使页面和逻辑更加的独立,清晰。当我们面对少量的内容时,js 片段要比写一大堆 coffeescript 来的更省事些。所以,我们在确定选用哪种方式处理,要看我们面对的是怎样的问题。
最后附上两个附表。
附表一,当我们 render json:..., status: :ok, ... 时,status 和符号的对应,可以在这里找到,一般我们用 :ok, :create, :success, :error 就足够了。
| Response Class | HTTP Status Code | Symbol |
|---|---|---|
| Informational | 100 | :continue |
| 101 | :switching_protocols | |
| 102 | :processing | |
| Success | 200 | :ok |
| 201 | :created | |
| 202 | :accepted | |
| 203 | :non_authoritative_information | |
| 204 | :no_content | |
| 205 | :reset_content | |
| 206 | :partial_content | |
| 207 | :multi_status | |
| 208 | :already_reported | |
| 226 | :im_used | |
| Redirection | 300 | :multiple_choices |
| 301 | :moved_permanently | |
| 302 | :found | |
| 303 | :see_other | |
| 304 | :not_modified | |
| 305 | :use_proxy | |
| 306 | :reserved | |
| 307 | :temporary_redirect | |
| 308 | :permanent_redirect | |
| Client Error | 400 | :bad_request |
| 401 | :unauthorized | |
| 402 | :payment_required | |
| 403 | :forbidden | |
| 404 | :not_found | |
| 405 | :method_not_allowed | |
| 406 | :not_acceptable | |
| 407 | :proxy_authentication_required | |
| 408 | :request_timeout | |
| 409 | :conflict | |
| 410 | :gone | |
| 411 | :length_required | |
| 412 | :precondition_failed | |
| 413 | :request_entity_too_large | |
| 414 | :request_uri_too_long | |
| 415 | :unsupported_media_type | |
| 416 | :requested_range_not_satisfiable | |
| 417 | :expectation_failed | |
| 422 | :unprocessable_entity | |
| 423 | :locked | |
| 424 | :failed_dependency | |
| 426 | :upgrade_required | |
| 428 | :precondition_required | |
| 429 | :too_many_requests | |
| 431 | :request_header_fields_too_large | |
| Server Error | 500 | :internal_server_error |
| 501 | :not_implemented | |
| 502 | :bad_gateway | |
| 503 | :service_unavailable | |
| 504 | :gateway_timeout | |
| 505 | :http_version_not_supported | |
| 506 | :variant_also_negotiates | |
| 507 | :insufficient_storage | |
| 508 | :loop_detected | |
| 510 | :not_extended | |
| 511 | :network_authentication_required |
附表二:ajax 的回调方法,我们使用了 :success 和 :error,当然还有其他的一些,我们需要了解下。
| event name | extra parameters * | when |
|---|---|---|
ajax:before |
before the whole ajax business , aborts if stopped | |
ajax:beforeSend |
[event, xhr, settings] | before the request is sent, aborts if stopped |
ajax:send |
[xhr] | when the request is sent |
ajax:success |
[data, status, xhr] | after completion, if the HTTP response was a success |
ajax:error |
[xhr, status, error] | after completion, if the server returned an error ** |
ajax:complete |
[xhr, status] | after the request has been completed, no matter what outcome |
ajax:aborted:required |
[elements] | when there are blank required fields in a form, submits anyway if stopped |
ajax:aborted:file |
[elements] | if there are non-blank input:file fields in a form, aborts if stopped |